


Introduction
Why?
A CXR will either not reveal, or not distinguish well between, pleural, alveolar or interstitial pathology while US does.
CT is complex:
- Cost
- Irradiation - Chest CT of a woman <30yrs increases risk of breast CA by 35%.
- Delay
- Transport
- Contrast nephropathy
- Low resolution (compared to US).
Most pathology extends to the pleural line (effusion and pneumothorax always) which is easily seen.
A simple protocol allow an accurate diagnosis in acute respiratory failure >90% of the time in under 5 minutes (Blue Protocol).
Air and Fluid
Lung US is based on the relative amounts of air and fluid in the lung. The speed which a wave propagates though a medium depends on the density of the medium. It propagates faster the denser the molecules.
Air 330m/s
Fat, soft tissue and muscle 1500
Bone 3500
The acoustic impedance of air and fluid is quite different. When US crosses a boundary between mediums of different impedances, much of the sound will be reflected back to the transducer. This means most of the US will be reflected back to the transducer when it meets air resulting in the commonly quoted statement that US is not transmitted through air. Seeing through air requires a different frequency from that used in medical US.
The combination of air and fluid in the lung results in the creation of artefacts in the 2D image. For most US, artefacts stop you seeing what you want to see but lung US relies on them in conditions where the lung is predominantly aerated.
Pneumothorax consists of only air while a pleural effusion is only fluid. There is a range between these 2 extremes of normal lung (98% air), interstitial syndrome (95%), alveolar syndrome (10%), atelectasis (5%), all with different US appearances.
It is important to remember that due to gravity fluid is usually dependent and air non dependent.
The probe and settings
Your machine is likely to have 1 of, or a combination of, an ECHO probe (microconvex around 3-4.5MHz), an abdominal probe (curvilinear around 3-5MHz) and/or a linear probe (8-12MHz). Lung ultrasound can be done with any of these probes but each has their advantages and disadvantages.
Modern echo probes have a useful footprint but poor images for the lung unless highly fluid filled. You can see all the signs of lung ultrasound but I would not recommend them unless it is all you have.
A high frequency linear probe is OK for the upper examination points but not the lower (see below). It allows very easy appreciation of lung sliding which can be more subtle with other probes and so is most useful to rule out a pneumothorax. Anterior interstitial syndrome can also be detected with a linear probe.
An abdominal probe is best as long as you get used to working around the ribs. Judge for yourself the quality of the images I obtain - most of my images for the lung on this site were obtained with an abdominal probe. It is worth noting that artefacts worsen diagnostic accuracy in most ultrasound but are vital in lung ultrasound. If your machine allows you to, it is worth experimenting with turning off some of the image optimisation features such as harmonic imaging to see if this improves artefact (B-line) visualisation. It may not - if you have a sonosite machine then I think the best images of A-lines and B-lines with an abdominal probe are obtained with the resolution setting on the highest frequency (‘res’) and MB and THI both on. If looking at alveolar syndrome and pleural effusions remember to turn the frequency down to ‘gen’.
Suggested probes and settings:
Where to place the probe
The best starting point is to use 3 positions on each side of the chest. Lichtenstein calls these the Upper BLUE point, Lower BLUE point and PLAPS point.
To make things simpler I will call these the Upper Anterior Point, Lower Anterior Point and Posterolateral point.
Apply 2 hands side by side (without your thumbs) over the anterior chest with your wrists in the anterior axillary line and your upper little finger resting along the clavicle. Your lower little finger will be aligned with the lower border of the lung (the phrenic line).
For each point the probe should be placed at 90 to the skin, looking into the lung, with the left of the screen cephalad and the right caudad. All views are longitudinal and not transversal.
Upper Anterior point. This corresponds to the base of the middle and ring fingers on the upper hand. Lies over the upper lobe.
Lower Anterior point. This is the middle of the palm on the lower hand (close to the nipple in an adult). Lies over the middle or lingular lobe.
These points will miss the heart on the left.
These points are used to detect or rule out pneumothorax (air being non dependent).
They are also used to look for interstitial syndrome and alveolar consolidation.
Posterolateral point. From the Lower Anterior Point move laterally and posteriorly as far as possible behind the posterior axillary line (limited by the bed). Lies over the lower lobe. For improved diagnostic accuracy you also need to look down 1-2 intercostal spaces until the diaphragm is visualised.
For this point the probe is still at 90, looking into the chest, with cephalad displayed on the left of the screen and caudad right (ie the probe is aligned with the axillary lines). With an abdominal probe rib shadows can then be minimised by rotating the probe slightly anticlockwise to lie between the ribs (cephalad will still be left).
These points are used to view effusions and consolidations (which can extend to anterior points if severe).
Those who are experienced will be able to make more liberal use of the probe over the thorax but these are starting points that you should get in the habit of using. They allow a thorough, quick and symmetrical examination with a high diagnostic accuracy.
US can also be used in the prone position with the probe placed adjacent to the mid scapula and then immediately inferior to it (which is only a few cm above the phrenic line).
The image
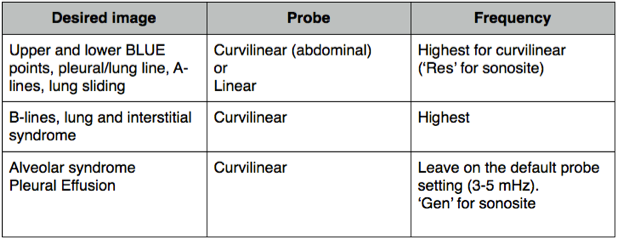
Rib shadows will be seen (as the sound is reflected back to the probe as above) and in between them the pleural line about 0.5cm below the rib line. Centre this in your image and you will see the ‘bat sign’ with the ribs as the wings.
The bat sign. Notice the lung line at 3cm and 2 A-lines (artefacts from the lung line) at 6 and 9cm.
All signs in lung US arise from the pleural line except for subcutaneous emphysema which will abolish it (as there is air above it).
There are 10 main signs to look for in lung US:
- The bat sign
- A-lines
- Lung sliding
- Quad sign
- Sinusoid sign
- Tissue sign
- Shred sign
- B-lines
- Stratosphere sign
- Lung point
Lung sliding
The visceral and parietal pleura are usually closely opposed with a minute amount of fluid between them (not seen on US) and slide over one another with respiration.
The appearance of this is a shimmering of the pleural line best appreciated with experience.
In fact the whole of the sub pleural space between the ribs will shimmer.
The pleural line will also have little blebs moving from side to side that looks a bit like ants crawling along it.
Small artefacts projecting a few millimetres below the plural line (these are not B-lines) will move with sliding.
Any B-lines present will move with lung sliding.
Lung sliding in 2D
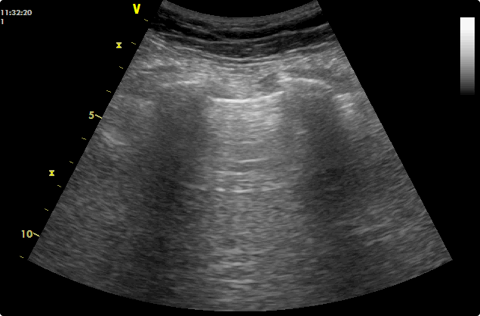
An M-mode image with lung sliding present will show the ‘sea shore’ sign. Subcutaneous tissue above the pleural line generates horizontal straight lines while there will be a sandy appearance below the pleural line created by the movement of lung sliding. In pneumothorax the screen will consist only of the horizontal straight lines as all the sound is reflected back with reverberation artefacts - the ‘stratosphere sign’ (More on this in pneumothorax). It is good practice to confirm sliding using 2D rather than M-mode to avoid potential pitfalls - M-mode is just used to record a still image for documentation.
M-mode image demonstrating the sea shore sign of lung sliding
A-lines
In normal lungs you will see either nothing or A lines below the pleural line. A-lines are reverberation artefacts from the pleural line. US rebounds several times between strong reflectors before returning to the transducer. This increases the time to return, which is interpreted as the structure being further away than it is, causing ghost images beyond the structure. These will move in tandem with the structure and be the same distance below the real image as the real image is from the probe.
Either absence of artefact or A-lines signifies air below the pleural line. They are present in normal aerated lung and in pneumothorax.
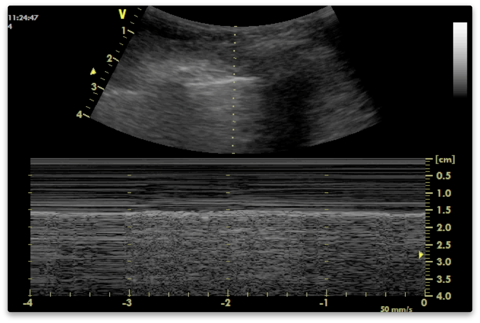
Pleural line at 2.25cm with A-lines at 4.5, 6.75 and 9cm
B-lines
These are artefacts that result from the mingling of air in the alveoli and water in the interlobular septa. The sound reverberates to and fro between the septa (because of the juxtaposition of air and water) creating a line for each reverberation which combine to form B-lines.
Characteristics of B-lines are:
They arise from the pleural line.
They are long, vertical hyperechoic lines which continue to the depths of the image. They look like comet tails (another name for them).
They erase A-lines
They move with lung sliding.
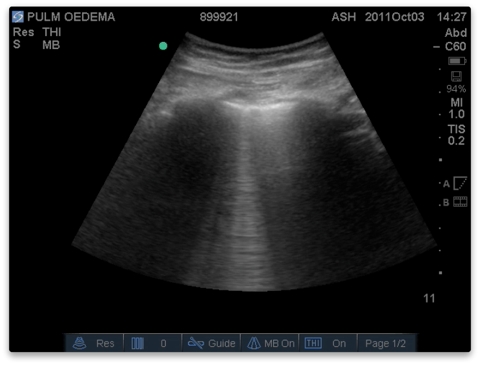
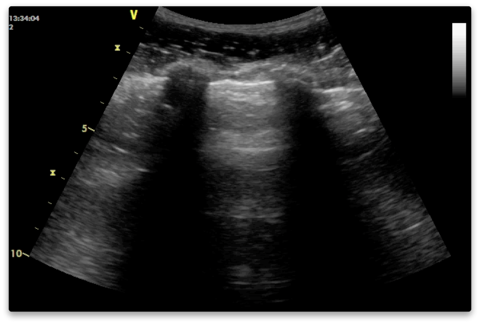
1 B-line. 1 A-line just visible to the right of the B-line at 5cm. B-lines are best appreciated in a video clip. (You may notice the caption at the top of the image ‘pulmonary oedema’. More than 3 B-lines are become visible in the video clip this image is taken from).
Comet tail like artefacts will arise from anywhere where fluid air are next to each other. They are often seen at the deep margins of a consolidation (which might only be a few millimetres below the pleural line). Unless they arise from the pleural line they are not technically called B lines.
More on B-lines can be read in lung and interstitial syndrome.